
Copper Craft
Flat seam copper roof
When moving from a steep-sloped natural slate roof to a low-slope or "flat" section, the physics of water shedding changes. You can no longer rely on gravity alone to pull water over the laps; you must create a monolithic, watertight surface.
As outlined by the technical standards at copper.org, a successful flat seam installation is not just a roofing project—it is a complex metal engineering task. Here is a breakdown of the technical details visible in our recent installation.
1. Panel Dimensions and Thermal Movement
While standard roofing often uses large sheets, flat seam systems traditionally utilize smaller panels—often 18" x 24" or smaller. This is a critical design choice recommended by the CDA to manage thermal expansion. By using smaller "tiles" of copper, the cumulative movement of the metal is distributed across a higher frequency of seams, preventing the buckling or "oil-canning" that can plague larger, improperly fastened sections.
2. The Anatomy of the Soldered Lock
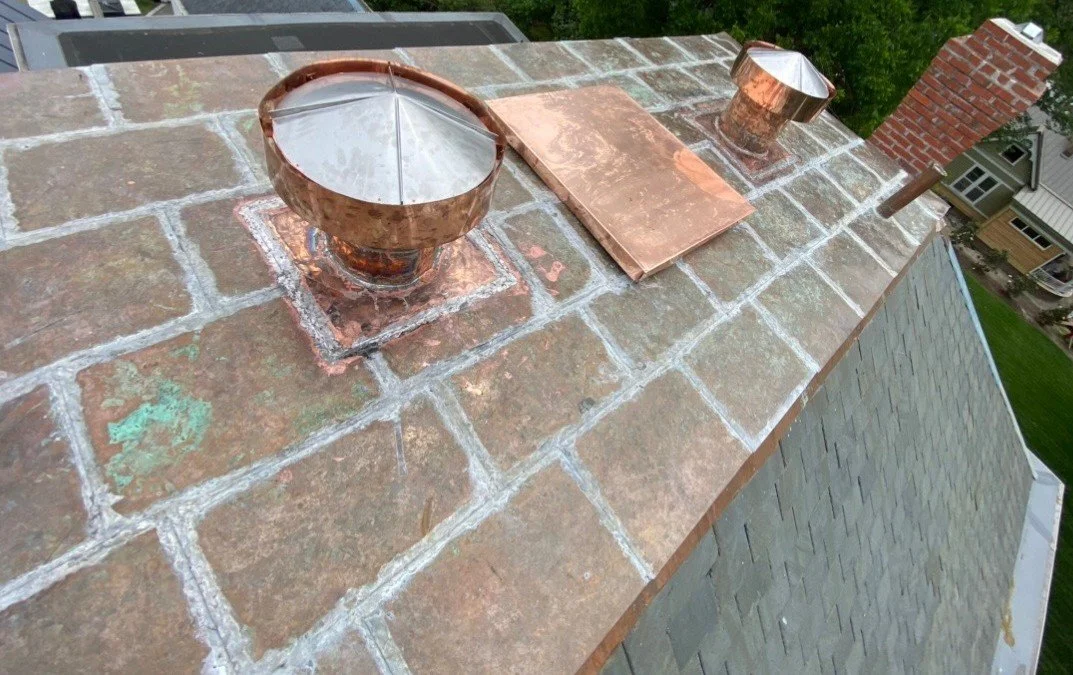
In the provided image, the bright silver lines indicate where the panels have been joined. This is a half-inch or three-quarter-inch transverse lock.
Pre-tinning: Before the panels are even brought to the roof, the edges are "tinned" with solder to ensure a perfect bond.
The Mechanical Lock: The panels are engaged with one another and flattened.
The Solder Fill: Using a heavy soldering copper (iron), 50/50 tin-lead solder is drawn into the seam. According to copper.org specifications, the solder must be "sweat" entirely through the lock to create a joint that is as strong—or stronger—than the copper sheets themselves.
3. Integrated Penetrations and Flashing
Look closely at the vent pipes in the photo. In a high-end copper system, we do not use rubber boots or caulking. Following CDA best practices, the vent bases are custom-fabricated from copper and soldered directly to the flat seam deck. This creates a single, unbroken skin of metal.
4. The Slate-to-Copper Transition
The most delicate point of the installation is where the natural slate meets the copper deck. To maintain a watertight seal, the copper must extend up the slope beneath the slate at least 4 inches (or more depending on the climate and pitch).
Cleating: We use individual copper cleats spaced every 12 inches to secure the metal without pinning it. This allows the copper to move independently of the wood deck and the slate above it.
Hemming: The top edge of the copper is hemmed to prevent water from being blown upward behind the flashing.
5. Material Specifications
For this level of detail, we typically utilize 20-ounce cold-rolled copper. Cold-rolled copper has a much higher tempered strength than soft (lead-coated) copper, ensuring that the flat seams remain crisp and the panels stay flat over decades of temperature swings.
Why These Details Matter
A flat seam roof is one of the most expensive and labor-intensive systems to install. However, when executed to the standards of the Copper Development Association, it is a "century roof." By focusing on the nitty-gritty of soldering chemistry and thermal management, we ensure that the transition from slate to copper remains as dry 50 years from now as it is today.
For more technical data on copper roofing specifications, visit copper.org.